slack → RaspberryPiを実現するため

python3.6で実装

下記を参考に

【AWS Lambdaの基本コードその4】 AWS IoTにメッセージをPublish

事前に作っておいたエンドポイント raspberrypi/speak へ送信

RaspberryPi側でsubscribeできることを確認しておく


Lambda応答

return {
‘isBase64Encoded’: False,
‘statusCode’: statusCode,
‘body’: json.dumps(dict),
‘headers’: {
‘Content-Type’: ‘application/json’,
},
}


Lambdaの注意点

API Gateway側でプロキシ統合を選んだ場合は、Lambda側で実装しなくてはならない

API Gateway側で吸収するなら、決まった形式で返す必要がある

こことか参考にさせてもらった

https://qiita.com/taknuki/items/dd47d1c6d4190b52df9a#%E3%83%AC%E3%82%B9%E3%83%9D%E3%83%B3%E3%82%B9


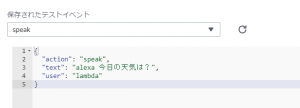
テスト送信しておく

AWS IoT

raspberry pi用のthingsを作成

ダウンロードした証明書とroot証明書を配置、エンドポイントを控えておく


Raspberry Pi

AWS IoTのMQTTクライアントを導入。Pahoを使用。

下記にまとめている

https://github.com/nilesflow/AWSIoTSpeaker/blob/master/README.md


AWS IoT Device SDK for C 等もあるが、pythonクライアントとした

下記ソースを参考にさせて貰った

MQTT with AWS IoT Platform using Python and Paho

から参照して下記Git Repository

https://github.com/pradeesi/AWS-IoT-with-Python-Paho


準備

pip install paho-mqtt

pip install boto3

git clone https://github.com/nilesflow/AWSIoTSpeaker/blob/master/README.md

証明書を配置

vi config.ini

  • AWS IoTのHost、証明書情報を入力
  • トピック名を指定

今回は、raspberrypi/#とした


起動(バックグラウンド起動しておく)

python index.py &


Amazon polly でテキスト→音声変換し、mp3ファイルをローカルに保存

mp3ファイルを再生

音声ファイルの生成処理は下記を参照

AWS SDK for Python (boto3)でAmazon Pollyの声を使い分けてみる


mp3の再生は下記を参考に

第12回「Raspberry Piで音遊び!」


コマンドラインからの再生テスト

apt-get install mpg321

mpg321 polly.mp3


pythonからの再生は下記を参照

https://qiita.com/Nyanpy/items/cb4ea8dc4dc01fe56918

pygameで再生


上記ソースでは、raspberrypi/speak トピックで指定音声を再生するようにしている

AWS IoTのテスト画面からトピックを発行して確認しておく

ELBは各リージョン。

cloudfrontは、バージニア北部のみ。


https://elb.nilesflow.net

https://cloudfront.nilesflow.net/

SSL評価はAだったよという話。
https://www.ssllabs.com/ssltest/analyze.html?d=cloudfront.nilesflow.net&latest
https://www.ssllabs.com/ssltest/analyze.html?d=elb.nilesflow.net&latest

yum install unzip

cd /usr/local/src/
curl “https://s3.amazonaws.com/aws-cli/awscli-bundle.zip” -o “awscli-bundle.zip”
unzip awscli-bundle.zip
./awscli-bundle/install -i /usr/local/aws -b /usr/local/bin/aws
/usr/local/bin/aws –version

/usr/local/bin/aws configure
/usr/local/bin/aws deploy register –instance-name centos7 –iam-user-arn arn:aws:iam::1234567890:user/deploy–tags Key=deploy,Value=true –region ap-northeast-1

mkdir -p /etc/codedeploy-agent/conf
vi /etc/codedeploy-agent/conf/codedeploy.onpremises.yml

/usr/local/bin/aws deploy install –override-config –config-file /etc/codedeploy-agent/conf/codedeploy.onpremises.yml –region ap-northeast-1


Only Ubuntu Server, Red Hat Enterprise Linux Server and Windows Server operating systems are supported.


centos7 もamazon linuxも

IAMユーザーでアクセスするには、


まず、アカウントから

https://console.aws.amazon.com/billing/home#/account


請求情報に対する IAM ユーザーアクセス

で、IAMアクセスのアクティブ化を行うこと。


そのあと、IAMポリシーをアタッチする。

AWSの説明ページ

https://docs.aws.amazon.com/ja_jp/AmazonS3/latest/dev/mpuoverview.html


最少パートサイズ 5MB

https://docs.aws.amazon.com/ja_jp/AmazonS3/latest/dev/qfacts.html


AWS-SDKで試してみたが、やっぱり駄目みたい。

AWS HTTP error: Client error: 400 EntityTooSmall (client): Your proposed upload is smaller than the minimum allowed size –
<Error>
<Code>EntityTooSmall</Code>
<Message>Your proposed upload is smaller than the minimum allowed size</Message>
<ProposedSize>4194304</ProposedSize>
<MinSizeAllowed>5242880</MinSizeAllowed>
<PartNumber>1</PartNumber>
<ETag>xxx</ETag>
<RequestId>xxx</RequestId>
<HostId>xxx=</HostId>
</Error>’


PHP + CURLは、MultipartUploadがなぜだかそもそもうまくいってない。

<?xml version=”1.0″ encoding=”UTF-8″?>
<Error>
<Code>RequestTimeout</Code>
<Message>Your socket connection to the server was not read from or written to within the timeout period. Idle connections will be closed.</Message>
<RequestId>xxx</RequestId>
<HostId>xxx</HostId>
</Error>


★アップロード順番は順不同でも、completeMultipartUploadに渡す順序を正しく渡せばOK

$parts = array();

$partNumber = 2;
$file = fopen(‘awssdk-5MB-2’, ‘r’);
$result = $s3->uploadPart(array(
‘Bucket’ => $bucket,
‘Key’ => $keyname,
‘UploadId’ => $uploadId,
‘PartNumber’ => $partNumber,
‘Body’ => fread($file, 10 * 1024 * 1024),
));
fclose($file);

$parts[] = array(
‘PartNumber’ => $partNumber,
‘ETag’ => $result[‘ETag’],
);

$file = fopen(‘awssdk-5MB-1’, ‘r’);
$partNumber = 1;
$result = $s3->uploadPart(array(
‘Bucket’ => $bucket,
‘Key’ => $keyname,
‘UploadId’ => $uploadId,
‘PartNumber’ => $partNumber,
‘Body’ => fread($file, 10 * 1024 * 1024),
));
fclose($file);

$parts[] = array(
‘PartNumber’ => $partNumber,
‘ETag’ => $result[‘ETag’],
);

$parts = array_reverse($parts);

cd /usr/local/src/
wget “http://sourceforge.net/projects/s3tools/files/latest/download?source=files”
mv download\?source\=files s3cmd-1.6.0.tar.gz
tar xvzf s3cmd-1.6.0.tar.gz
cd s3cmd-1.6.0
yum install python-setuptools
python ./setup.py install
s3cmd


[nilesflow@tk2-234-26954 glusterfs]$ s3cmd –configure
Enter new values or accept defaults in brackets with Enter.
Refer to user manual for detailed description of all options.

Access key and Secret key are your identifiers for Amazon S3. Leave them empty for using the env variables.
Access Key: xxx
Secret Key: yyy
Default Region [US]: us-west-2

Encryption password is used to protect your files from reading
by unauthorized persons while in transfer to S3
Encryption password: zzz
Path to GPG program [/usr/bin/gpg]:

When using secure HTTPS protocol all communication with Amazon S3
servers is protected from 3rd party eavesdropping. This method is
slower than plain HTTP, and can only be proxied with Python 2.7 or newer
Use HTTPS protocol [Yes]:

New settings:
Access Key: xxx
Secret Key: yyy
Default Region: us-west-2
Encryption password: zzz
Path to GPG program: /usr/bin/gpg
Use HTTPS protocol: True
HTTP Proxy server name:
HTTP Proxy server port: 0

Test access with supplied credentials? [Y/n] Y
Please wait, attempting to list all buckets…
Success. Your access key and secret key worked fine 🙂

Now verifying that encryption works…
Success. Encryption and decryption worked fine 🙂

Save settings? [y/N] y
Configuration saved to ‘/home/nilesflow/.s3cfg’


★PUT

[nilesflow@tk2-234-26954 s3cmd]$ s3cmd put s3cmd.txt s3://nilesflowfirstbucket
‘s3cmd.txt’ -> ‘s3://nilesflowfirstbucket/s3cmd.txt’ [1 of 1]
6 of 6 100% in 0s 72.27 B/s done
‘s3cmd.txt’ -> ‘s3://nilesflowfirstbucket/s3cmd.txt’ [1 of 1]
6 of 6 100% in 0s 42.13 B/s done


★マルチパートアップロード 50MB

[nilesflow@tk2-234-26954 s3cmd]$ dd if=/dev/zero of=s3cmd-50MB bs=50MB count=1
1+0 records in
1+0 records out
50000000 bytes (50 MB) copied, 0.191449 s, 261 MB/s
[nilesflow@tk2-234-26954 s3cmd]$ ll

[nilesflow@tk2-234-26954 s3cmd]$ s3cmd put –multipart-chunk-size-mb=5 s3cmd-50MB s3://nilesflowfirstbucket
‘s3cmd-50MB’ -> ‘s3://nilesflowfirstbucket/s3cmd-50MB’ [part 1 of 10, 5MB]
5242880 of 5242880 100% in 0s 14.18 MB/s done
‘s3cmd-50MB’ -> ‘s3://nilesflowfirstbucket/s3cmd-50MB’ [part 2 of 10, 5MB]
5242880 of 5242880 100% in 0s 14.37 MB/s done
‘s3cmd-50MB’ -> ‘s3://nilesflowfirstbucket/s3cmd-50MB’ [part 3 of 10, 5MB]
5242880 of 5242880 100% in 0s 15.60 MB/s done
‘s3cmd-50MB’ -> ‘s3://nilesflowfirstbucket/s3cmd-50MB’ [part 4 of 10, 5MB]
5242880 of 5242880 100% in 0s 12.77 MB/s done
‘s3cmd-50MB’ -> ‘s3://nilesflowfirstbucket/s3cmd-50MB’ [part 5 of 10, 5MB]
5242880 of 5242880 100% in 0s 15.85 MB/s done
‘s3cmd-50MB’ -> ‘s3://nilesflowfirstbucket/s3cmd-50MB’ [part 6 of 10, 5MB]
5242880 of 5242880 100% in 0s 15.12 MB/s done
‘s3cmd-50MB’ -> ‘s3://nilesflowfirstbucket/s3cmd-50MB’ [part 7 of 10, 5MB]
5242880 of 5242880 100% in 0s 18.30 MB/s done
‘s3cmd-50MB’ -> ‘s3://nilesflowfirstbucket/s3cmd-50MB’ [part 8 of 10, 5MB]
5242880 of 5242880 100% in 0s 10.19 MB/s done
‘s3cmd-50MB’ -> ‘s3://nilesflowfirstbucket/s3cmd-50MB’ [part 9 of 10, 5MB]
5242880 of 5242880 100% in 0s 15.32 MB/s done
‘s3cmd-50MB’ -> ‘s3://nilesflowfirstbucket/s3cmd-50MB’ [part 10 of 10, 2MB]
2814080 of 2814080 100% in 0s 5.10 MB/s done

AWSを利用したクラウドWEBシステムの構築パターンがデザインパターンとして数多く掲載されている。

AWSの知識を深めるために手に取ったが、書かれているデザインパターンはAWSだけで用いられるものではなく、WEBシステム全般に対してのシステム設計レベルでのデザインパターンとも言える。

WEBシステムを構成するにあたりどのような点に気を付けるべきか、どのような技術が必要か、AWSに限らず理解していて全く損のない本。

そういう意味では、「Amazon Web Services~」となっていなければ、もっと万人にリーチできたのかも?とも思ってしまった。

「はじめに」のエピソードにもある通り、システム開発の現場では共通言語があると、単純なコミュニケーションから設計のレビューまで話が早いことが多い。

ここで用いられるデザインパターンが現場で一般言語として使われると良いなと思う。


一冊通しで読んだが、正直デザインパターン名が頭に馴染まない。なぜだろう。笑

GoFのデザインパターンはもう少し浸透しやすかった気がしたが・・。

という事で、何度か復習してみようと思う。


あと、コーチャンフォーで間違って実装ガイドの方を買ってしまったので、そっちも読んでみよう。


Amazon SESへのProxyで確認

「サーバ名がサーバが期待しているものと違っている」旨のエラーになったので、

メーラで「証明書を検証しない」設定が必要だった。


stream {

#SMTP
upstream smtp {
server email-smtp.us-west-2.amazonaws.com:587 weight=5 max_fails=3 fail_timeout=30s;
}

server {
listen 587;
proxy_connect_timeout 1s;
proxy_timeout 3s;
proxy_pass smtp;
}

upstream smtps {
server email-smtp.us-west-2.amazonaws.com:465 weight=5 max_fails=3 fail_timeout=30s;
}

server {
listen 465;
proxy_connect_timeout 1s;
proxy_timeout 3s;
proxy_pass smtps;
}